Automating Product Card Images for Shopify Stores
Shopify solves the product image problem on day one. Every product has a photo, the photo becomes the og:image, and when someone shares a product link the photo is what appears. For a lot of stores that is the right answer and this article will tell you to leave it alone.
But the photo carries no price. No sale badge, no rating, no delivery promise, no brand frame. When a customer pastes a product link into WhatsApp, the preview shows a cropped photograph and whatever text the platform felt like truncating, and the two things most likely to earn the tap, the price and the discount, are nowhere in the image. A generated product card fixes that, and on Shopify the whole thing can run itself: product data in, branded card out, set as the og:image through a metafield and regenerated automatically when the price changes.
This is a build guide for that pipeline using an HTML to image API. It is aimed at developers and agencies running Shopify stores, the code is complete enough to ship, and by the end the only manual step left in the system is changing the price in Shopify admin.
When a generated card beats the product photo
Honesty first, because the photo wins more often than the card crowd admits. If your store trades on photography, lifestyle shots, editorial product images, anything where the picture is the persuasion, keep the photo as the og:image and stop reading. A templated card is a downgrade for a fashion label with a good photographer.
The card wins when context sells the click. Sale pricing is the obvious one: a preview showing $129 struck through from $179 with a discount badge does work the photo cannot. Ratings and review counts are social proof the photo does not carry. Stores whose customers share links in chat, WhatsApp, iMessage and Messenger previews, get a branded rectangle instead of an awkward crop of a tall product shot. And collections, blog posts and landing pages often have no natural image at all, which is how stores end up with a generic logo square on half their shared links.
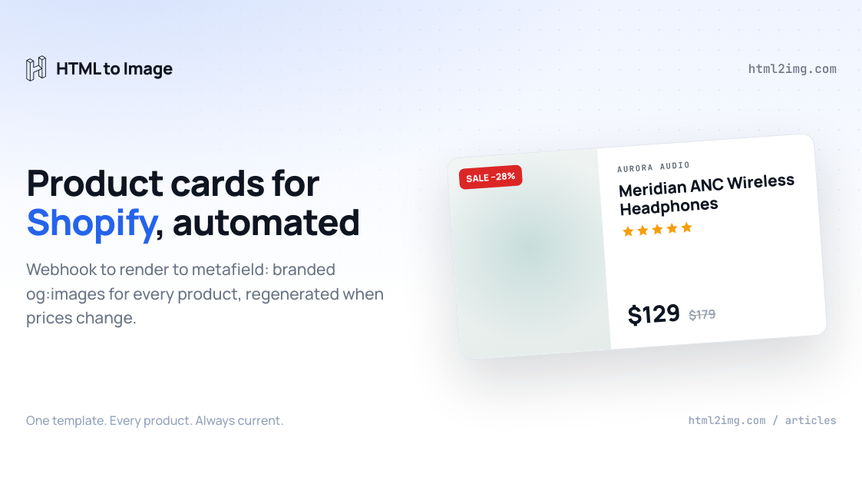
Here is the kind of output this article builds, rendered by the pipeline it describes:

One template produces that for every product in the catalogue, always current, with nobody opening a design tool.
The card template is just HTML
The template is an HTML file with holes in it. Anything CSS can draw is available, which is the point of rendering in a real browser rather than compositing layers in an image library: grid layout, web fonts, the product photo as a background, conditional sale badges.
A trimmed version of the template behind the card above:
<body style="width:1200px;height:630px;display:flex;font-family:'Manrope',sans-serif">
<div class="photo" style="background-image:url('{{FEATURED_IMAGE}}')">
{{#if ON_SALE}}<span class="badge">SALE −{{DISCOUNT_PCT}}%</span>{{/if}}
</div>
<div class="info">
<span class="brand">{{SHOP_NAME}}</span>
<h1>{{TITLE}}</h1>
<div class="rating">{{STARS_SVG}} {{RATING}} · {{REVIEW_COUNT}} reviews</div>
<div class="price">
<span class="now">{{PRICE}}</span>
{{#if ON_SALE}}<span class="was">{{COMPARE_AT}}</span>{{/if}}
</div>
</div>
</body>Use whatever templating your stack already speaks to fill the holes; the API only ever sees the finished HTML. The product card template in the gallery is a ready-made starting point, and once your design settles you can promote it to a named template and send only the variables per render instead of the markup.
Two rendering details worth locking in from the start. Render at 1200×630, the standard Open Graph size, and set dpi: 2 so the card is crisp in retina previews. And draw icons like rating stars as inline SVG rather than relying on glyph characters, which keeps the output identical regardless of what fonts the render host has installed.
Pulling the catalogue from the Admin API
Create a custom app in Shopify admin under Settings, then Apps and sales channels, then Develop apps, with the read_products and write_products scopes. That gives you an Admin API token for the store. The GraphQL query for everything the card needs:
query Products($cursor: String) {
  products(first: 50, after: $cursor) {
    pageInfo { hasNextPage endCursor }
    nodes {
      id
      title
      handle
      featuredImage { url }
      priceRangeV2 {
        minVariantPrice { amount currencyCode }
      }
      compareAtPriceRange {
        maxVariantCompareAtPrice { amount }
      }
    }
  }
}
priceRangeV2 against compareAtPriceRange is the sale logic: when the compare-at figure is higher than the price, the product is discounted and the card gets its badge and its struck-through was-price. Page through with the cursor until hasNextPage is false and you have the full catalogue.
Rendering, and only rendering what changed
The render itself is one request per product. The part that keeps the system cheap is the fingerprint in front of it:
import crypto from 'node:crypto';

function fingerprint(p) {
  return crypto.createHash('sha256')
    .update([p.title, p.price, p.compareAt, p.imageUrl].join('|'))
    .digest('hex');
}

async function renderCard(product, stored) {
  const fp = fingerprint(product);
  if (stored?.fingerprint === fp) return stored;   // nothing changed, 0 credits

  const res = await fetch('https://app.html2img.com/api/html', {
    method: 'POST',
    headers: {
      'X-API-Key': process.env.HTML2IMG_KEY,
      'Content-Type': 'application/json',
    },
    body: JSON.stringify({
      html: buildCardHtml(product),
      width: 1200,
      height: 630,
      dpi: 2,
    }),
  });

  const { url } = await res.json();
  return { fingerprint: fp, url };
}
The response's url is a hosted CDN address, which matters for what comes next: there is no image to download, store or upload to Shopify Files. The URL is the deliverable, and serving it costs nothing at any volume, which is the render-once economics doing exactly what an og:image needs. Store the URL and the fingerprint against the product id in whatever database the worker already has.
Setting the card as the og:image
Two halves: write the URL onto the product, then teach the theme to prefer it.
The write is a metafield, set through the same Admin API session:
mutation SetCard($metafields: [MetafieldsSetInput!]!) {
  metafieldsSet(metafields: $metafields) {
    metafields { id }
    userErrors { field message }
  }
}
{
"metafields": [{
"ownerId": "gid://shopify/Product/1234567890",
"namespace": "custom",
"key": "social_card",
"type": "url",
"value": "https://i.html2img.com/abc123.png"
}]
}The theme side is a few lines of Liquid. In Dawn and most modern themes the meta tags live in snippets/meta-tags.liquid, built from the page_image object. Add a branch above the existing image block that prefers the metafield and falls back to the photo:
{%- liquid
  assign social_card = product.metafields.custom.social_card.value
-%}
{%- if request.page_type == 'product' and social_card != blank -%}
  <meta property="og:image" content="{{ social_card }}">
  <meta property="og:image:width" content="1200">
  <meta property="og:image:height" content="630">
  <meta name="twitter:card" content="summary_large_image">
{%- else -%}
  {%- comment -%} existing page_image block stays here {%- endcomment -%}
{%- endif -%}
The fallback is the safety net that makes the rollout boring: any product without a card yet, or any render that ever fails, simply keeps showing its photo. Collections and blog articles take the same treatment through their own metafields if you want branded cards beyond products.
Keeping it current with webhooks
The backfill run above handles the catalogue as it exists today. Webhooks handle every day after. Subscribe to products/update and products/create, from Settings, then Notifications, then Webhooks, or through the API, pointed at a small endpoint on your worker.
Verify the signature before trusting anything:
function verifyShopifyWebhook(rawBody, hmacHeader) {
  const digest = crypto
    .createHmac('sha256', process.env.SHOPIFY_WEBHOOK_SECRET)
    .update(rawBody, 'utf8')
    .digest('base64');
  return crypto.timingSafeEqual(Buffer.from(digest), Buffer.from(hmacHeader));
}
Then run the same fingerprint-check-render-metafield sequence from earlier. The fingerprint stops being an optimisation here and becomes load-bearing, because products/update fires far more often than a card changes: edits to fields the card never shows and changes from apps and inventory systems all arrive as updates. The hash means the noisy majority cost you nothing and only a real change to title, price or photo spends a credit.
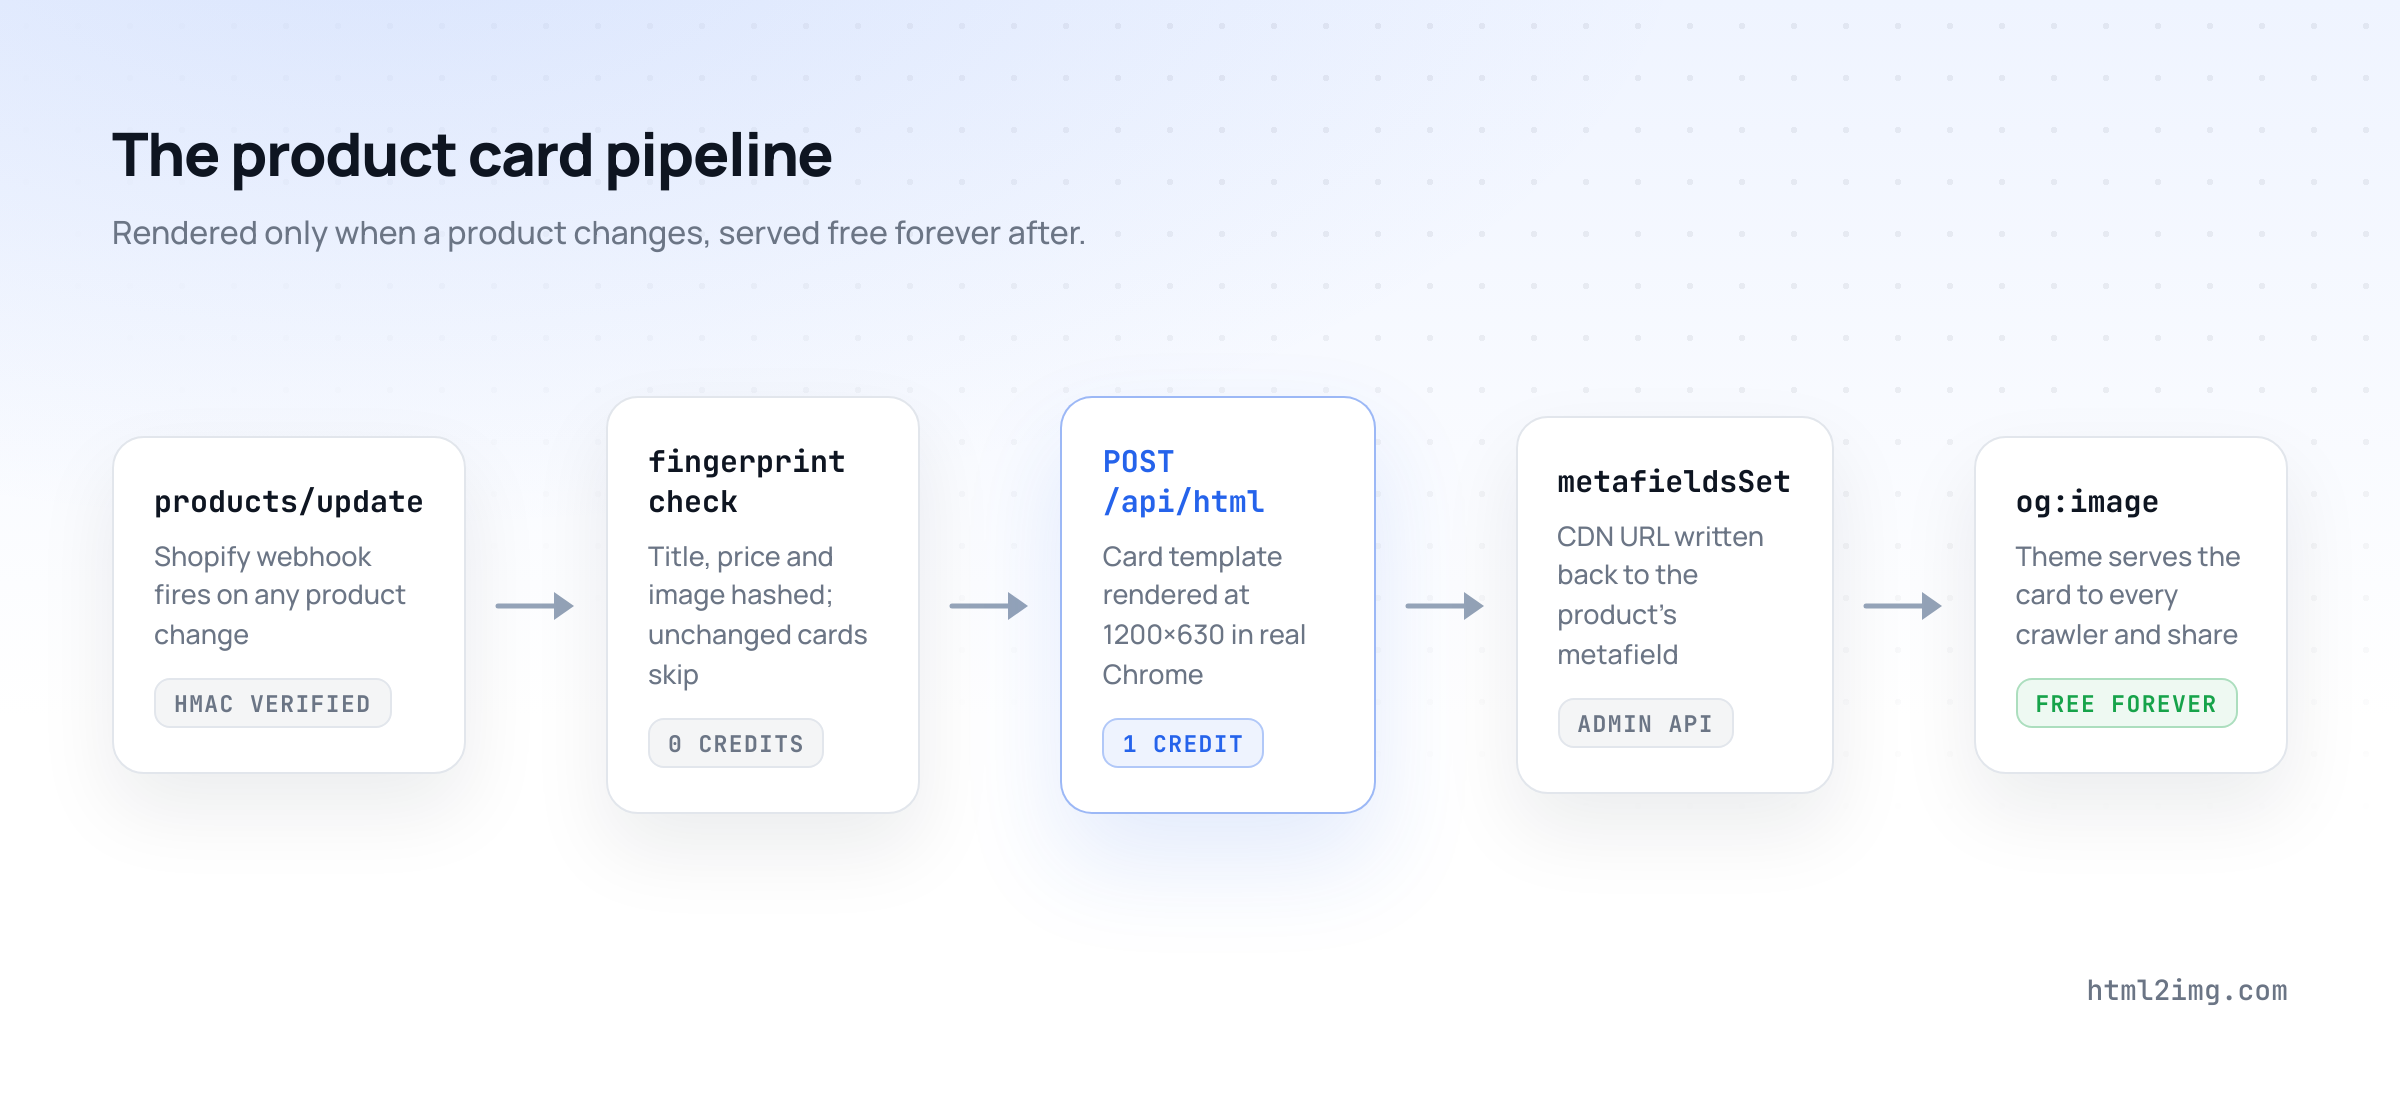
One refinement for the initial backfill on a big catalogue: pass a webhook_url on the render requests and let the finished URLs be POSTed back to you, rather than a worker holding a thousand connections open. Steady-state, the synchronous call inside the webhook handler is fine, because you are rendering one card at a time as products actually change.
What this costs to run
The arithmetic is friendly because renders track catalogue churn, not traffic. A 1,000-product store pays 1,000 credits once for the backfill, then a trickle: a weekly price review touching 40 products is 40 credits. The $9 plan's 1,000 monthly renders covers the backfill in month one and is loose change after, and every share, crawler hit and preview of every card is free from the CDN forever. The card for your best seller might be fetched a hundred thousand times; it cost one credit the day the price last changed.
The same maths is why doing this with a headless browser you run yourself is poor value at store scale: the render volume is too small to justify owning Chrome infrastructure, which is the build-versus-buy arithmetic in its purest form.
The same pipeline, three more outputs
Once product data flows through a card template, the og:image is just the first customer.
Email is the second. The images-in-email approach uses the same cards, or an email-shaped variant of the template, to put designed product blocks into campaigns that render identically in every client, because they are pixels rather than HTML for Outlook to interpret. Your abandoned-cart email showing the actual card, current price and sale badge included, is the same render call with a different consumer.
Paid social is the third: a square and a story-sized variant of the template give you creative for every product in the catalogue at a render apiece, regenerated when prices move, which is the part paid teams usually do by hand the week before a sale.
And a line sheet is the fourth. The same product data poured into a multi-page layout with format: "pdf" produces the wholesale catalogue PDF from live prices, one credit, no InDesign.
Four Shopify details that save a support ticket
Ask Shopify for a sensibly sized photo. featuredImage.url returns the original upload, which can be a 4,000px file. The render does not need it and large source images slow the capture, so request a transform in the query: featuredImage { url(transform: { maxWidth: 1000 }) } gives the template plenty for a 540px photo panel at retina.
Design the no-photo case. Some products, and most collections and posts, have no image. Give the template a fallback layout, a brand-coloured panel with the title doing the work, and branch on the missing URL when building the HTML. The card that looks intentional without a photo is precisely the case where a generated card was most needed anyway.
Clamp the title in CSS. Product titles run long, and a title that wraps to four lines pushes the price out of the frame. Two lines with an ellipsis keeps every card composed regardless of what merchandising typed:
h1 {
  display: -webkit-box;
  -webkit-line-clamp: 2;
  -webkit-box-orient: vertical;
  overflow: hidden;
}
Stale share caches solve themselves. Facebook and WhatsApp cache og:image hard, and the usual fix is begging the Sharing Debugger to re-scrape. This pipeline sidesteps the problem structurally: every render returns a fresh URL, so a price change produces a new og:image value, and crawlers treat a changed URL as a new image and fetch it. The card in previews follows the price without anyone touching a debugger.
One caveat to decide on before rollout rather than after: priceRangeV2 comes back in the shop's currency. If you sell in several currencies through Shopify Markets, the card shows base-currency pricing to everyone, which is either fine or a reason to leave prices off the card for those stores. Make that call deliberately.
The rollout order
Ship it in the order that keeps every step reversible. Theme change first, with the metafield branch and photo fallback, which does nothing until metafields exist. Backfill second, on a handful of products, and paste their links into a share preview checker and an actual WhatsApp chat. Widen the backfill to the catalogue. Turn the webhooks on last. From that point the system is closed: prices change in Shopify admin, cards follow within seconds, and the photo remains the automatic answer for anything the pipeline has not touched.
Building this for a store or a client? Start from the product card template and adapt the design, or read the docs and run the backfill on the free tier's 50 credits.

Written by
Mike Griffiths
Mike has spent the last 20 years crafting software solutions for all kinds of amazing businesses. He specializes in building digital products and APIs that make a real difference. As an expert in Laravel and a voting member on the PHP language, Mike helps shape the future of web development.