---
title: "How to Generate Pinterest Pins from an API for Every Blog Post, Recipe and Product"
description: "Generate Pinterest pins from an API: one JSON request per blog post, recipe or product returns a 1000x1500 PNG on a CDN URL you can pin straight away."
url: "https://html2img.com/articles/pinterest-pin-api/"
section: "Tutorials"
published: "2026-09-14T17:23:21.229Z"
updated: "2026-09-14T17:26:03.943Z"
---
# How to Generate Pinterest Pins from an API for Every Blog Post, Recipe and Product
By Mike Griffiths. https://html2img.com/articles/pinterest-pin-api/

A food blog with 300 recipes has 300 pins to make. A shop with 80 products in a Pinterest-friendly category has 80, plus a fresh set every time the catalogue changes. A travel site that publishes twice a week needs two more every week for as long as it publishes. Pinterest is the one social platform where that effort pays back for years, because pins behave like search results rather than feed posts, and it is still the platform where most teams design each pin by hand in Canva or skip it altogether.
This article shows how to render Pinterest pins from an API instead: one request per post, a 1000x1500 PNG back on a hosted URL, and a loop that covers the whole archive. Every image below is the actual output of the request above it.
## What a Pinterest pin has to get right
Three things separate a pin that gets saved from one that gets scrolled past, and all three are decided before the request is sent.
The first is the ratio. Pinterest recommends 2:3 for standard pins, which is 1000x1500 at the size it documents, and the feed is built around that shape. Taller pins get cropped in the grid so the bottom of the design disappears, and a horizontal blog hero reused as a pin turns into a thin strip between two full-height competitors. The `pinterest-pin` template defaults to 1000x1500 for this reason, and if you render your own markup through the HTML endpoint you set the same dimensions yourself.
The second is the text. Pinterest is a search engine, so the pin surfaces next to a query, at thumbnail size, on a phone. The title has to be readable at roughly a third of its rendered size, which means a bold weight, a large size and a short line count. Four or five words per line and no more than three lines is the working rule. Supporting copy is fine as long as it stays clearly secondary.
The third is the image behind the text. Pinterest audiences respond to a photo, and a photo behind a title needs either a solid panel for the text or an overlay strong enough to hold contrast. This is the part that drifts when pins are made by hand, and the part a template fixes once.
The template route below handles the ratio and the layout for you. The custom HTML route handles all three at the cost of writing the markup once.
## Route 1: render from JSON with the template endpoint
The Pinterest Pin template takes one required input, `title`, and seven optional ones for a subtitle, an eyebrow label, the site name, a background photo, a logo and two colours:
```
curl -X POST https://app.html2img.com/api/v1/templates/pinterest-pin \
-H "X-API-Key: $HTML2IMG_API_KEY" \
-H "Content-Type: application/json" \
-d '{
"title": "The best day hikes in Iceland'\''s highlands",
"subtitle": "Twelve routes from two-hour loops to a full-day ridge walk, sorted by difficulty.",
"eyebrow": "TRAVEL GUIDE",
"site_name": "northroads.co",
"background_image_url": "https://picsum.photos/id/393/1000/1500",
"background_color": "#F4F6F5",
"accent_color": "#0F766E"
}'
```
The response is the standard envelope with a CDN URL:
```
{
"success": true,
"id": "60cd7f89-e9f0-4d9a-8d83-16d949f61564",
"template": "pinterest-pin",
"expires_at": null,
"credits_remaining": 100,
"url": "https://i.html2img.com/image-1789406387141-373279.png"
}
```
And this is the file at that URL:

A few things the render does without being asked. The photo is masked into the top half and the title sits on a solid panel beneath it, so the contrast problem never arises: whatever the photo looks like, the text is dark on a plain background. The title has been sized to fill the panel across two lines, which is the weight that reads in a search grid. The `accent_color` shows up in the eyebrow pill, the rule under the title and the site name, and nowhere else, so one hex value keeps the pin on-brand without turning the whole card that colour.
The file came back at 2000x3000, because the template renders at 2x, and at 4.5 MB with the photo. That is well inside the 20 MB Pinterest allows for an image pin and sharp on a retina feed. If you need a lighter file, the HTML route below renders at 1x unless you ask for more.
Two inputs are left out above. `logo_url` replaces the text site name with your mark, and `background_image_url` can be dropped entirely, in which case the top half becomes a flat `background_color` panel, which suits a listicle or a quote pin better than a photo would. Both URLs are fetched at render time, so they need to be publicly reachable, and a product photo behind a CDN or a signed S3 URL both work. The [Pinterest Pin template page](https://html2img.com/templates/pinterest-pin) has sample renders and use cases, the [template reference](https://html2img.com/docs/templates/pinterest-pin/) lists every input with its default, and the [Pinterest Pin tool](https://html2img.com/tools/pinterest-pin) runs the same template in the browser if you want to settle on colours before writing the request.
## Route 2: your own layout through the HTML endpoint
The template is one design. A brand with an established pin style, or a pin that needs elements the template does not have (a recipe stats row, a numbered listicle hook, a call-to-action button), needs its own markup. That is the HTML endpoint, and because you set the dimensions it is also how you get a 1000x2100 long pin if you ever want one:
```
curl -X POST https://app.html2img.com/api/html \
-H "X-API-Key: $HTML2IMG_API_KEY" \
-H "Content-Type: application/json" \
-d @- <<'JSON'
{
"width": 1000,
"height": 1500,
"html": "
Sourdough basics
7
mistakes that flatten your sourdough
Under-proofed dough, a cold oven and five other things that stop the loaf rising. Each one is a two-minute fix.
24hTotal time
1 loafMakes
EasySkill
hearthandpan.comRead the guide
"
}
JSON
```
That produced this, a native 1000x1500 PNG at 294 KB:
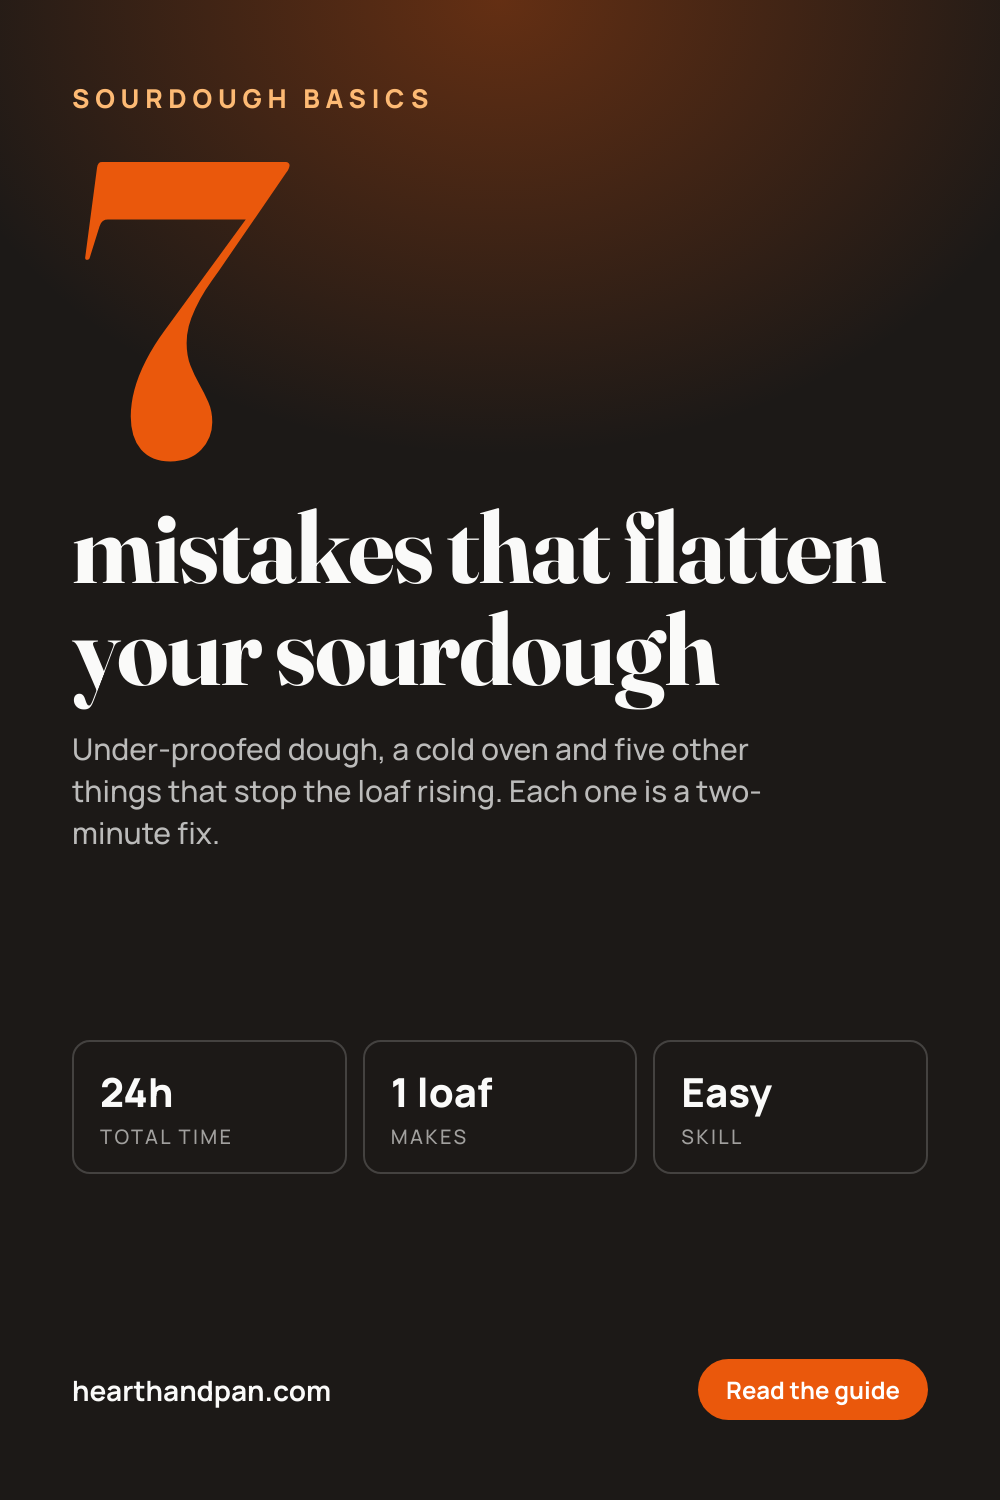
The markup is ordinary CSS. Fonts load through `@import`, so a display serif for the number and headline and a sans for everything else costs one line. The `.wrap` is a flex column with `justify-content: space-between`, which pins the header block to the top, the stats row to the middle and the site name and button to the bottom whatever length the title turns out to be. The button is a `span` with a border radius; it is not clickable, because a pin is a picture, but a button-shaped element tells the viewer the pin leads somewhere, which is why it turns up on so many high-performing pins.
Two things to carry over from the template route. First, `overflow: hidden` on the body and an explicit `width` and `height` matching the request, so a long title cannot push the footer below the canvas. Second, the render is a real browser screenshot, so a photo is a `background-image` with a gradient overlay on top, and a product pin is the same markup with the price in one of the stat boxes.
To match the template's 2x output, add `"dpi": 2` to the request and the same markup comes back at 2000x3000. The [DPI parameter](https://html2img.com/docs/parameters/dpi) is the only change; the CSS pixel dimensions stay at 1000x1500.
## Pinning the hosted URL
The URL in the response is the whole handoff. Pinterest's API creates a pin from an image URL, fetches the file once and stores its own copy, so the CDN URL only has to be live at the moment you create the pin:
```
curl -X POST https://api.pinterest.com/v5/pins \
-H "Authorization: Bearer $PINTEREST_TOKEN" \
-H "Content-Type: application/json" \
-d '{
"board_id": "1042359123456789012",
"link": "https://northroads.co/guides/iceland-highlands-day-hikes",
"title": "The best day hikes in Iceland'\''s highlands",
"description": "Twelve routes from two-hour loops to a full-day ridge walk, sorted by difficulty.",
"media_source": {
"source_type": "image_url",
"url": "https://i.html2img.com/image-1789406387141-373279.png"
}
}'
```
The `title` and `description` on the pin are what Pinterest indexes for search, so send the same words you rendered into the image rather than leaving them blank. The `link` is the page the pin sends traffic to. If you schedule through Tailwind or a similar tool instead of the API directly, the same hosted URL goes in the image field.
## One pin per post, at publish time
A single pin is a curl. The value is in the archive, and the archive is a loop. Given the posts as JSON, each with a title, a hook, a category, a hero image URL and a page URL:
```
import json
import os
import requests
RENDER = "https://app.html2img.com/api/v1/templates/pinterest-pin"
PIN = "https://api.pinterest.com/v5/pins"
with open("posts.json") as f:
posts = json.load(f)
for post in posts:
render = requests.post(
RENDER,
headers={"X-API-Key": os.environ["HTML2IMG_API_KEY"]},
json={
"title": post["title"],
"subtitle": post["hook"],
"eyebrow": post["category"].upper(),
"site_name": "northroads.co",
"background_image_url": post["hero_image"],
"background_color": "#F4F6F5",
"accent_color": "#0F766E",
},
).json()
pin = requests.post(
PIN,
headers={"Authorization": f"Bearer {os.environ['PINTEREST_TOKEN']}"},
json={
"board_id": post["board_id"],
"link": post["url"],
"title": post["title"],
"description": post["hook"],
"media_source": {"source_type": "image_url", "url": render["url"]},
},
).json()
post["pin_url"] = render["url"]
post["pin_id"] = pin["id"]
print(f'{post["title"]}: {pin["id"]} ({render["credits_remaining"]} credits left)')
with open("posts.json", "w") as f:
json.dump(posts, f, indent=2)
```
The script writes the rendered URL and the Pinterest pin id back onto each post record, so the JSON file records what has been pinned and where, and running it again on new posts only touches the ones without a `pin_id`. The same loop in PHP, Node or Ruby is a dozen lines through the [SDKs and integration guides](https://html2img.com/integrations). If the posts live in a Laravel app, the [Laravel integration](https://html2img.com/integrations/laravel) makes the render a facade call inside a `PostPublished` listener, so the pin exists a few seconds after the post does. On WordPress, the [plugin](https://html2img.com/integrations/wordpress) puts the same API inside the admin without any of this code.
A few notes for an archive of any size:
- Each render is one credit, and `credits_remaining` comes back in every response so the loop can stop cleanly before a 402.
- For a backlog in the hundreds, pass a `webhook_url` with each render and let the API post the URL back to you, then create the pin in the webhook handler rather than holding the connection open.
- Pinterest rewards fresh pins over repins of the same image, so the standard tactic is two or three pins per post with a different title, a different photo or a different `accent_color`. That is a second loop over the same records, not a second design job, which is the point of rendering rather than drawing.
## The same pin at other sizes
Most sites need the 2:3 for Pinterest and nothing else, but a recipe or product that goes on Pinterest usually goes on Instagram Stories and into an Open Graph preview too. The Stories format is 1080x1920 and has the same "keep the text out of the top and bottom" discipline as the pin; the [Instagram Story template](https://html2img.com/templates/instagram-story) handles it from the same inputs. The link preview is 1200x630 and the [safe zone guide](https://html2img.com/articles/og-image-safe-zone) covers where each platform crops it. For product pins specifically, the [Shopify product card article](https://html2img.com/articles/shopify-product-card-images) walks through pulling the catalogue and rendering one card per SKU; swap the endpoint for `pinterest-pin` and the loop is the same.
---
Need a pin for every post, recipe or product rendered from JSON without opening a design tool? [Browse the templates gallery](https://html2img.com/templates) or [read the docs](https://html2img.com/docs) to get started.